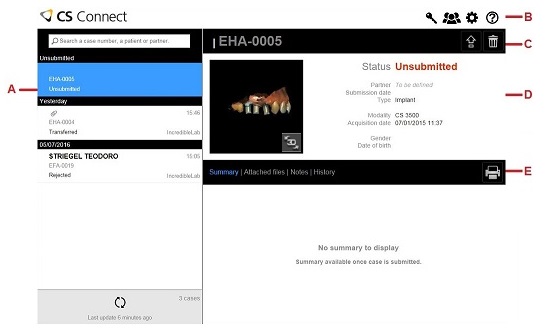
A |
Case List To refresh the case list, click |
|
B |
CS Connect Toolbar |
|
|
Session button: Click to check current login status and to sign out. |
|
|
Partners button: Click to check Laboratory status. The following icon indicates that a partner notification has
been delivered: |
|
|
Settings button: Click to configure your CS Connect settings. |
|
|
Help button: Click to display this online help system. |
|
C |
Management Toolbar |
|
|
Submit Case: For Dentists, the Submit Case icon is used to upload the selected case so that the designated Laboratory can download it. |
|
|
Download Case: For Laboratories, the Download Case icon is used to download case information from a Dentist. For Dentists, if the case has been submitted to a Laboratory, the Download Case icon is used to download the case to the computer. |
|
|
Delete
Case: For Dentists, click to delete the selected case from
the CS Connect case list. Reject Case: For Laboratories, click to reject a case submitted by a Dentist. |
|
D |
Case Overview: Displays a summary of the selected case. |
|
|
|
Displays the impression
in a dedicated 3D environment. |
E |
Display toolbar: Displays the following case display functions: |
|
Summary |
Click to display a detailed summary of the selected case. This link is displayed in blue when activated. |
|
Attached files |
Click to display a list of files attached to the selected case. This link is displayed in blue when activated. |
|
Notes |
Click to add and display detailed case notes. This link is displayed in blue when activated. |
|
History |
Click to display case history. This link is displayed in blue when activated. |
|
|
Print Case: Click to print the selected case. |
|
 .
. 


